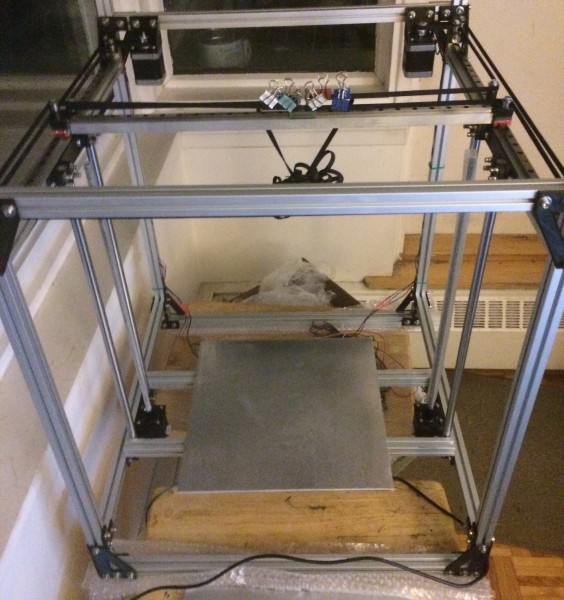
Last year I created an unusual proof of concept of a CoreXY type mechanism intended for use with a 3D printer. Although the initial tests were quite positive, I had concerns about the weight of the overall implementation and was very unsatisfied with my initial designs for the Z stage of the printer.
I recycled the parts into the K03 delta printer and let the idea simmer for a while, saving up some extra money for research and development of a new design.
I’ve switched from using hardware store tubing to slotted aluminum extrusions – these have worked out to about the same cost per meter and are far easier to work with. It seems there was no real savings to be found in using the hardware store extrusions and they were complicating assembly due to requiring precision drilled holes. Getting the holes in exactly the right spot with hand drills was tasking and as the K03 machine easily shows – the tubing ends up rather perforated if the design gets revised.
I purchased my extrusions from mainland China via AliExpress from a vendor who was very pleasant to deal with. The extrusions were very inexpensive but the shipping increased the cost greatly. It arrived within 10 days of ordering however which is not a bad lead time, and they pre-cut it in the 500mm lengths I needed to build my testing platform.
Instead of running the linear motion directly on the tubing itself like the previous design, I purchased some inexpensive miniature industrial rails. These are essentially MR9 rails which came in 500mm lengths, ready to go. These rails were easy to install using M3 bolts and they are light and smooth. The Y axis rails are supported directly on the 2020 extrusion frame, and the X axis rail is attached to a length of 1/2″ aluminum trim channel. The channel provides the necessary stiffness with very little added weight.
I am using lengths of GT2 timing belts instead of the fishing-line filament drive in the first prototype. The cost of these belts has been dropping significantly over the past few years, making it more cost effective to use them instead of the high-end braided fishing line.
The X and Y motors are mounted on very simple 3D printed brackets which can be slid along the extrusion to increase belt tensioning. All of the idler pulleys are made from a pair of flanged F694ZZ bearings which are very close in diameter to the 20 tooth GT2 drive pulleys. I’ve kept all of the belt corners running 90 degree angles and the two drive paths are each on their own plane, a few mm apart from each other. This avoids the unusual angles and crossover points found on some CoreXY builds.
I briefly considered H-Bot kinematics, however I’ve been pretty enamoured with the CoreXY design and these 9mm linear rails are not as resistant to racking motions as you’d need for H-Bot.
The X stage is incomplete at this time, the belts are clamped to the linear slide around some M3 bolts just to test the mechanism out. So far it’s been working well at speeds over 300mm/s. None of my extruder designs thus far would be capable of effectively pushing plastic through the hot end at that rate, but that’s a problem for another day. I’ll post more pictures and a video once I have a proper X carriage running on the machine.
The Z stage (also incomplete in the photo) uses two NEMA17 motors with a built-in 8mm acme lead screw. This should provide accurate layer movements. Each side is constrained by two 12mm diameter hardened steel rods which will have LM12UU bearings. I believe this should be quite sufficient to eliminate any sort of banding in the prints.


