

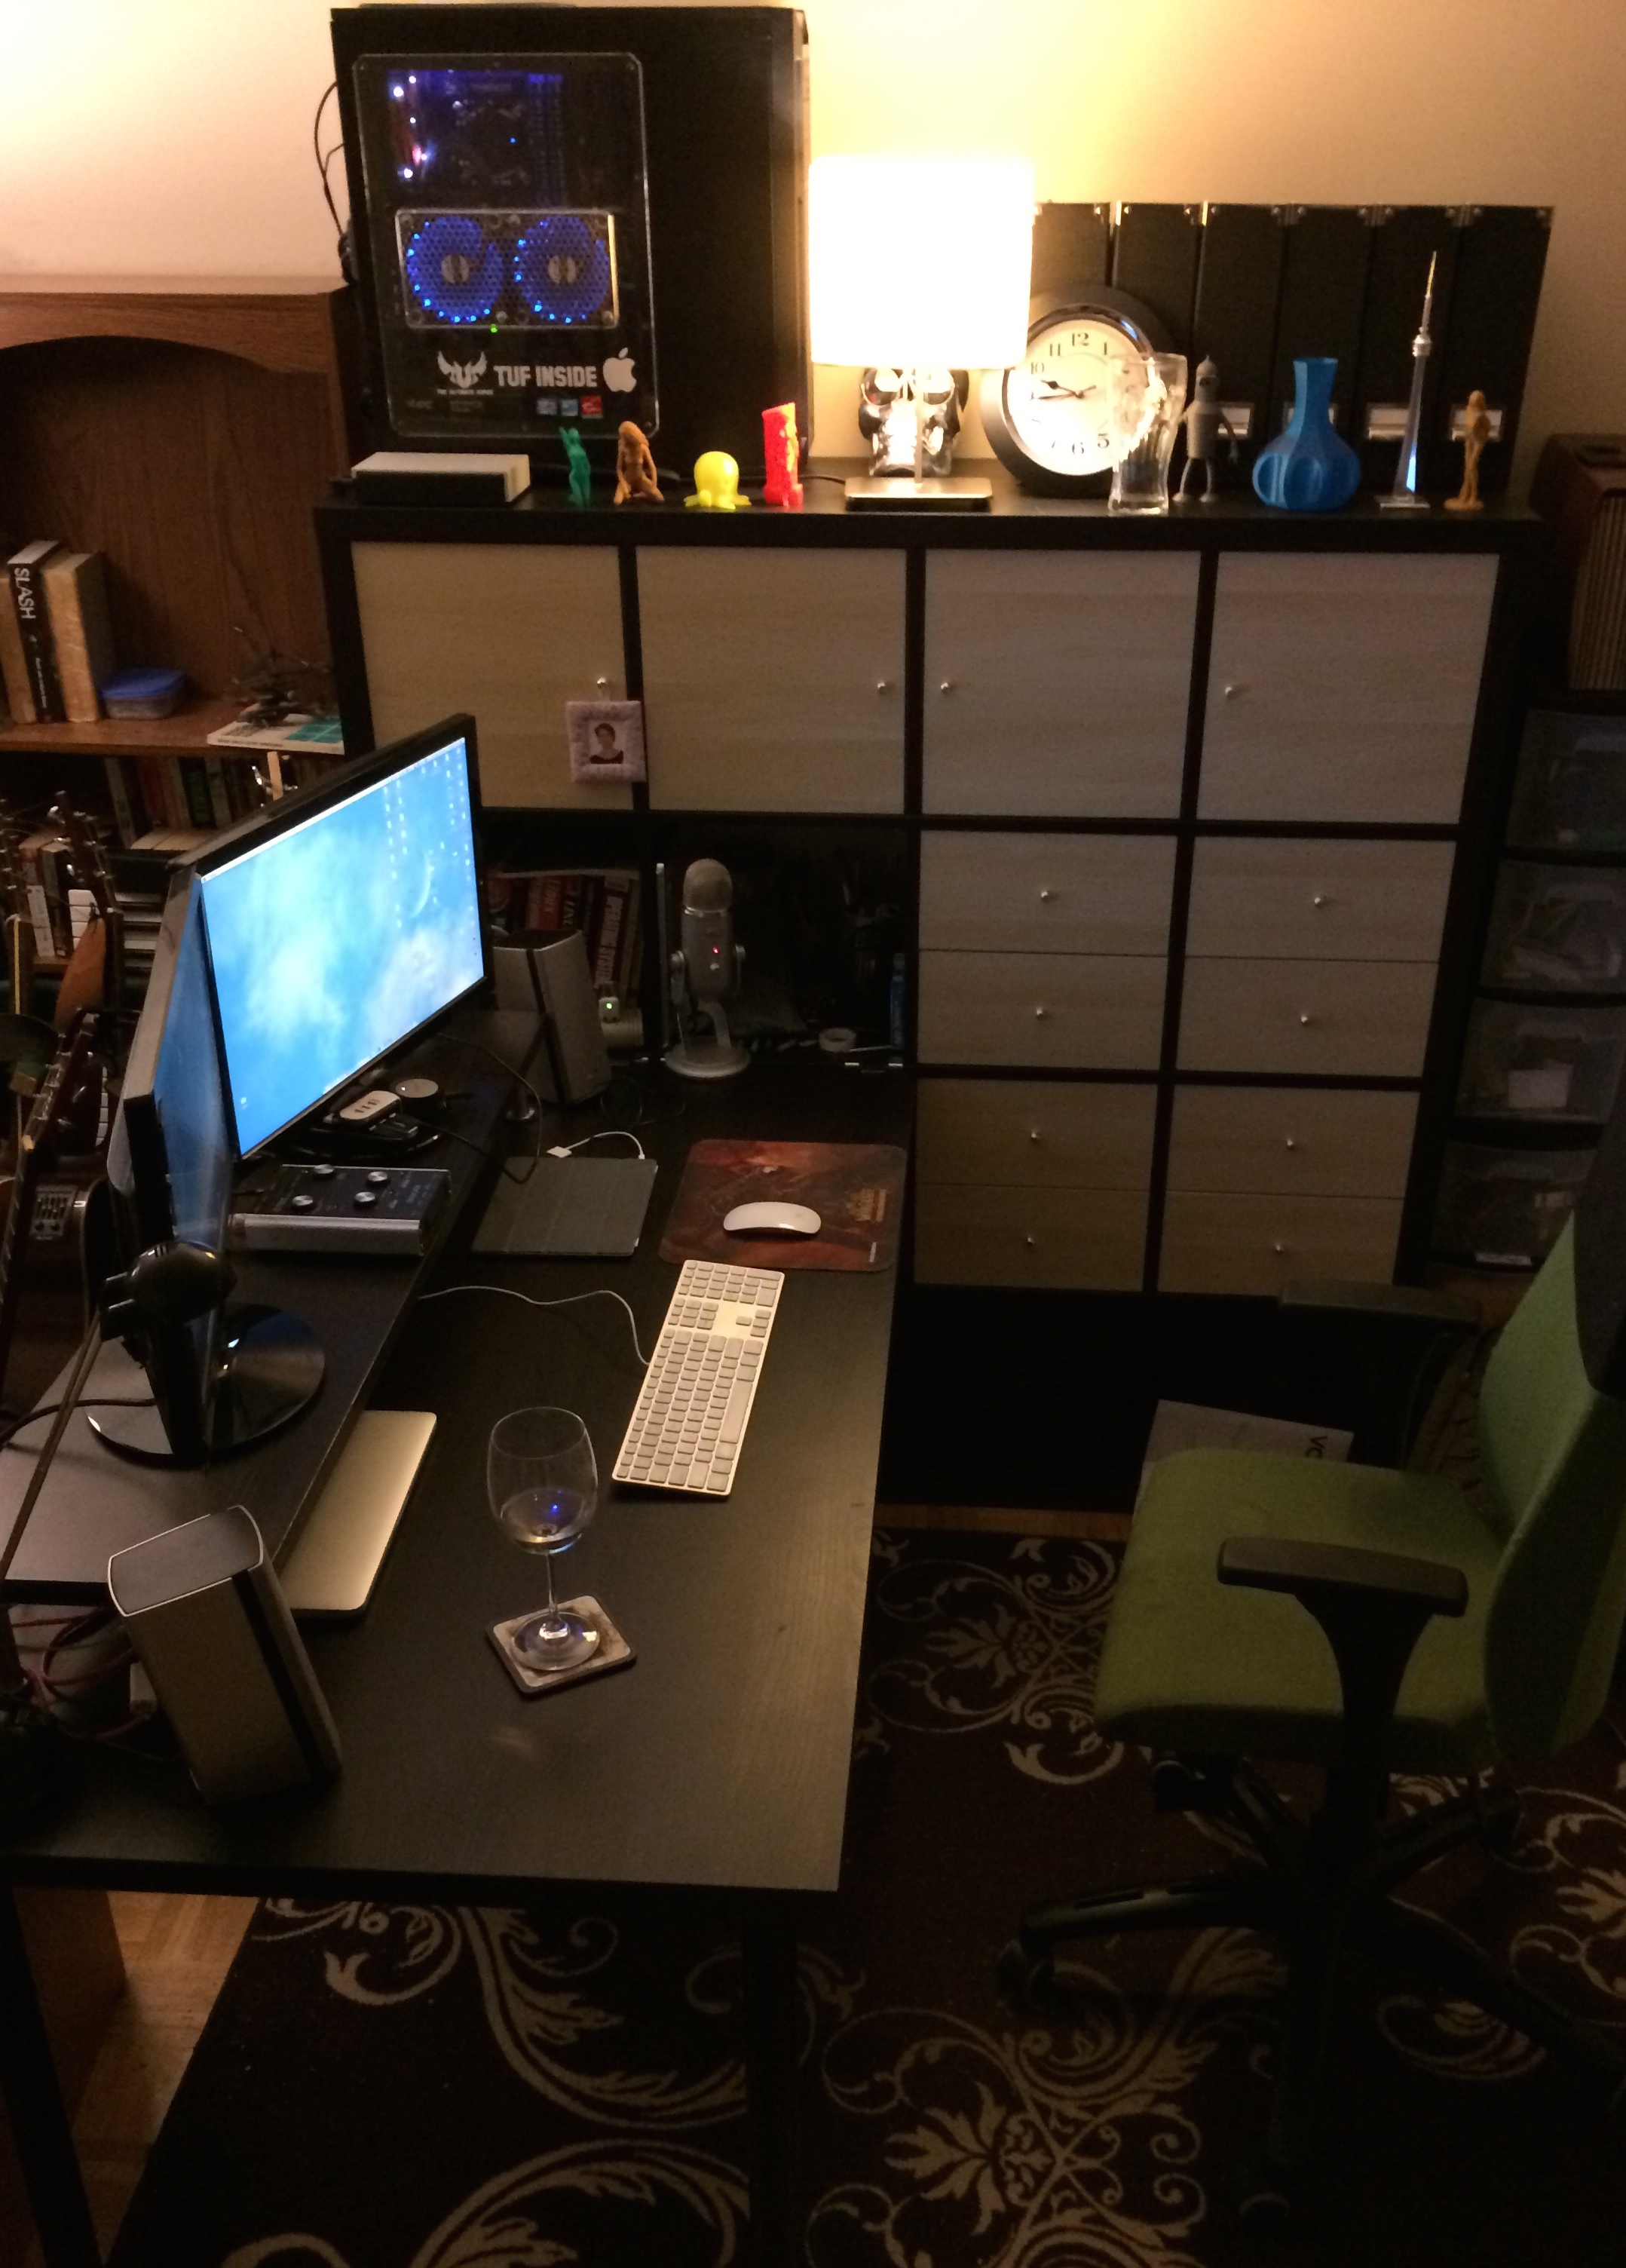
As per my long post the other day, I’ve been rebuilding my workspace with some of the new Ikea product lines. The core of it is a nice storage unit to keep everything organized (if such a thing is possible for me) and single large desk unit that is multi-functional.
This post details where I’ve deviated from the intended Ikea assemblies and in particular details an excellent way to make an inexpensive monitor shelf with blind mounting onto a desk which is necessary when you aren’t facing directly against a wall. I’ve tried to document my process for the hacks I’ve done in a way that will be helpful for others and I’ve included some tips at the end.
I started with the Kallax 4×4 cube unit (102.758.62) and some drawer, bin and door inserts (Kallax/Lekman). Quite standard, no hacks there – the unit has the same storage dimensions as it’s predecessor Expedit, just a thinner outer profile. Many Ikea hackers morn the loss of Expedit, but Kallax is a great unit and is designed to be paired with the newer Linnmon system. It seems quite sturdy, so I don’t know what the fuss is about. It’s not like the Bekant replacement system for Gallant which is nowhere near it’s predecessor’s modularity.
I picked up a Linnmon table top – (102.513.52) – this is a 150cm x 75cm table top. Not the biggest they sell, but it’s quite large and fits the space I have nicely. I built up the Kallax unit and attached the table top with a pack of the Linnmon brackets (402.610.57). Clear proof that Ikea meant for this combo to replace the old Expedit shelf/desk combo with this more modular combo, the Linnmon brackets are designed specifically to fit Kallax and I’m not sure they’d fit anything else properly. I rounded it off it with a set of Olov legs (102.225.81) and Signum wire holders underneath (302.002.53).
The original shelf I picked up to build a monitor stand out of was too short, so I exchanged the Ekby Viktor for an Ekby Jarpen (200.943.47) and picked up a second pack of the Linnmon brackets and a second pack of Capita legs (200.545.63).
Hack #1 – Strengthen Linnmon
That’s all pretty standard stuff and other than having to carefully drill the holes to mount the Signum, it was all typical Ikea smooth assembly and the table top was already pre-drilled to fit the legs so there was zero guesswork there. I proceeded to do a test run of adding all my computer equipment to it and was dismayed to notice that the table top had a slight bend in the middle. I think this was like this from the factory, it was really quite minor but it did concern me a bit. I was worried that increased and random weights that might be on it would acerbate the condition.
Part One – A Pine Spine
My first hack was to add a rib of pine plank down the middle of the bottom of the table top – as I mentioned, I was concerned about warping of the desk and didn’t want it to actually become an issue to worry about down the road. I like to overbuild things a bit when possible.
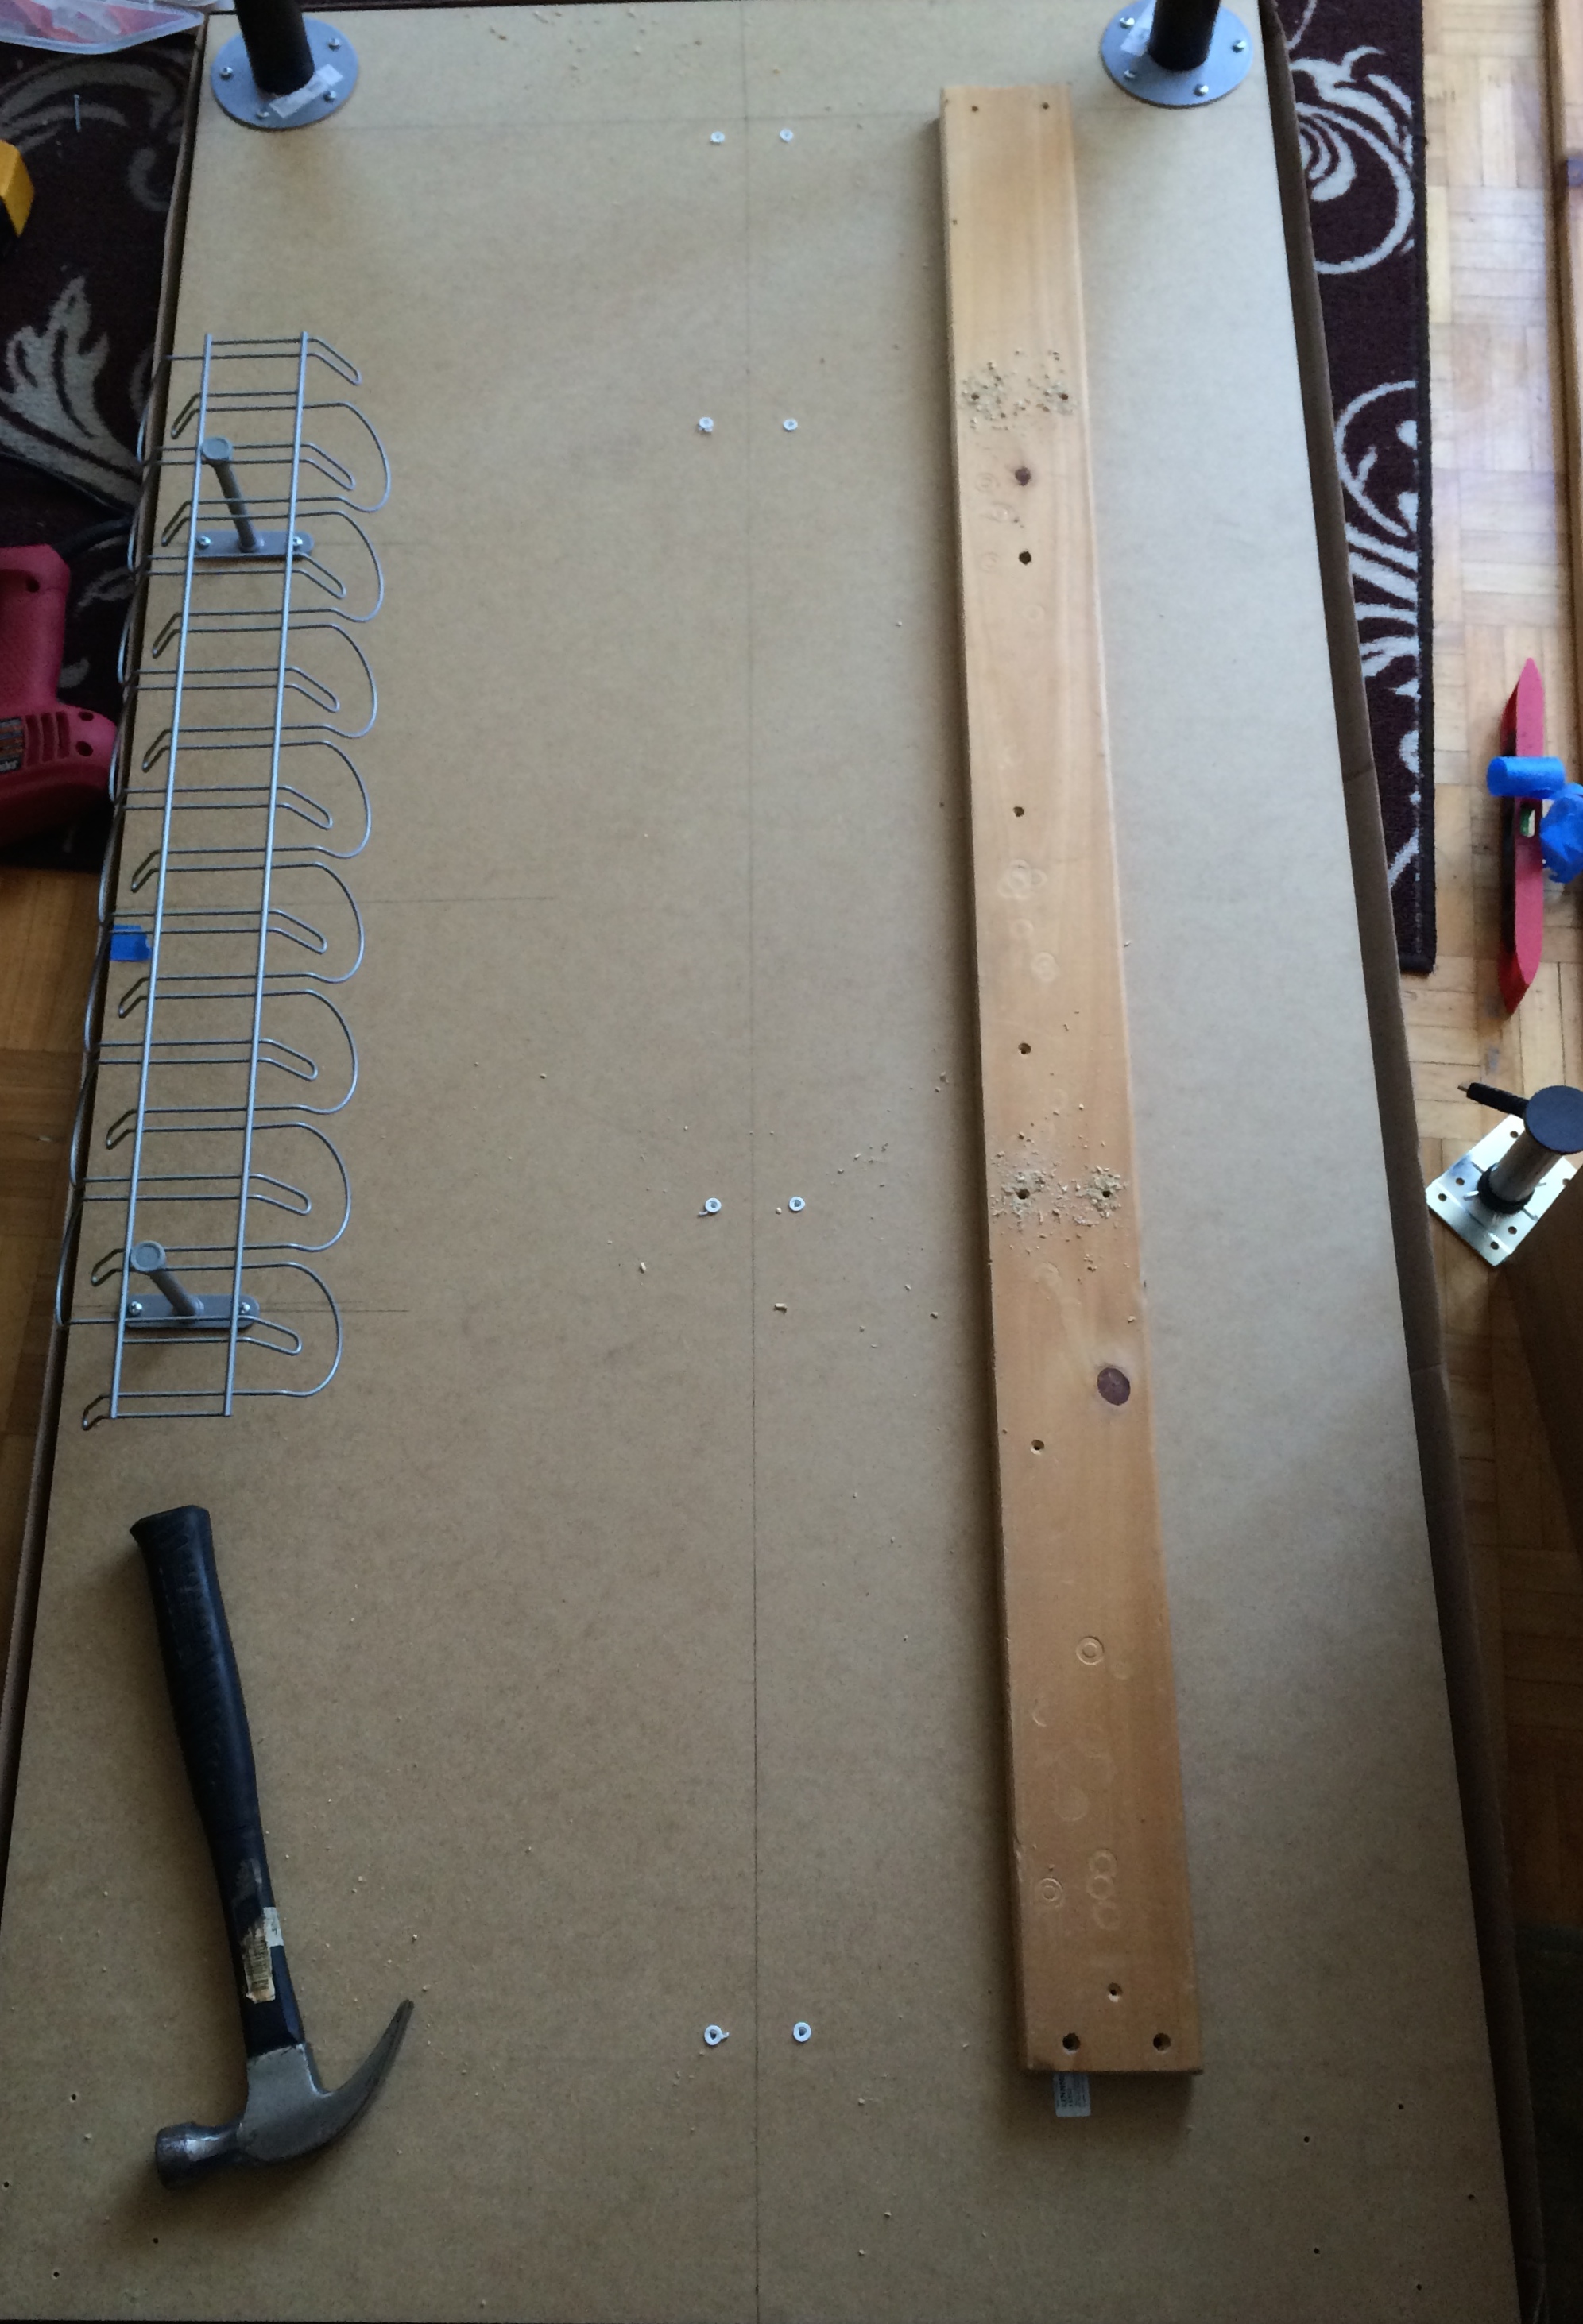
As you can see, I wasn’t too picky about where the mounting holes went – I reused ones that were already in the scrap pine plank and put drywall plugs into the drilled holes.
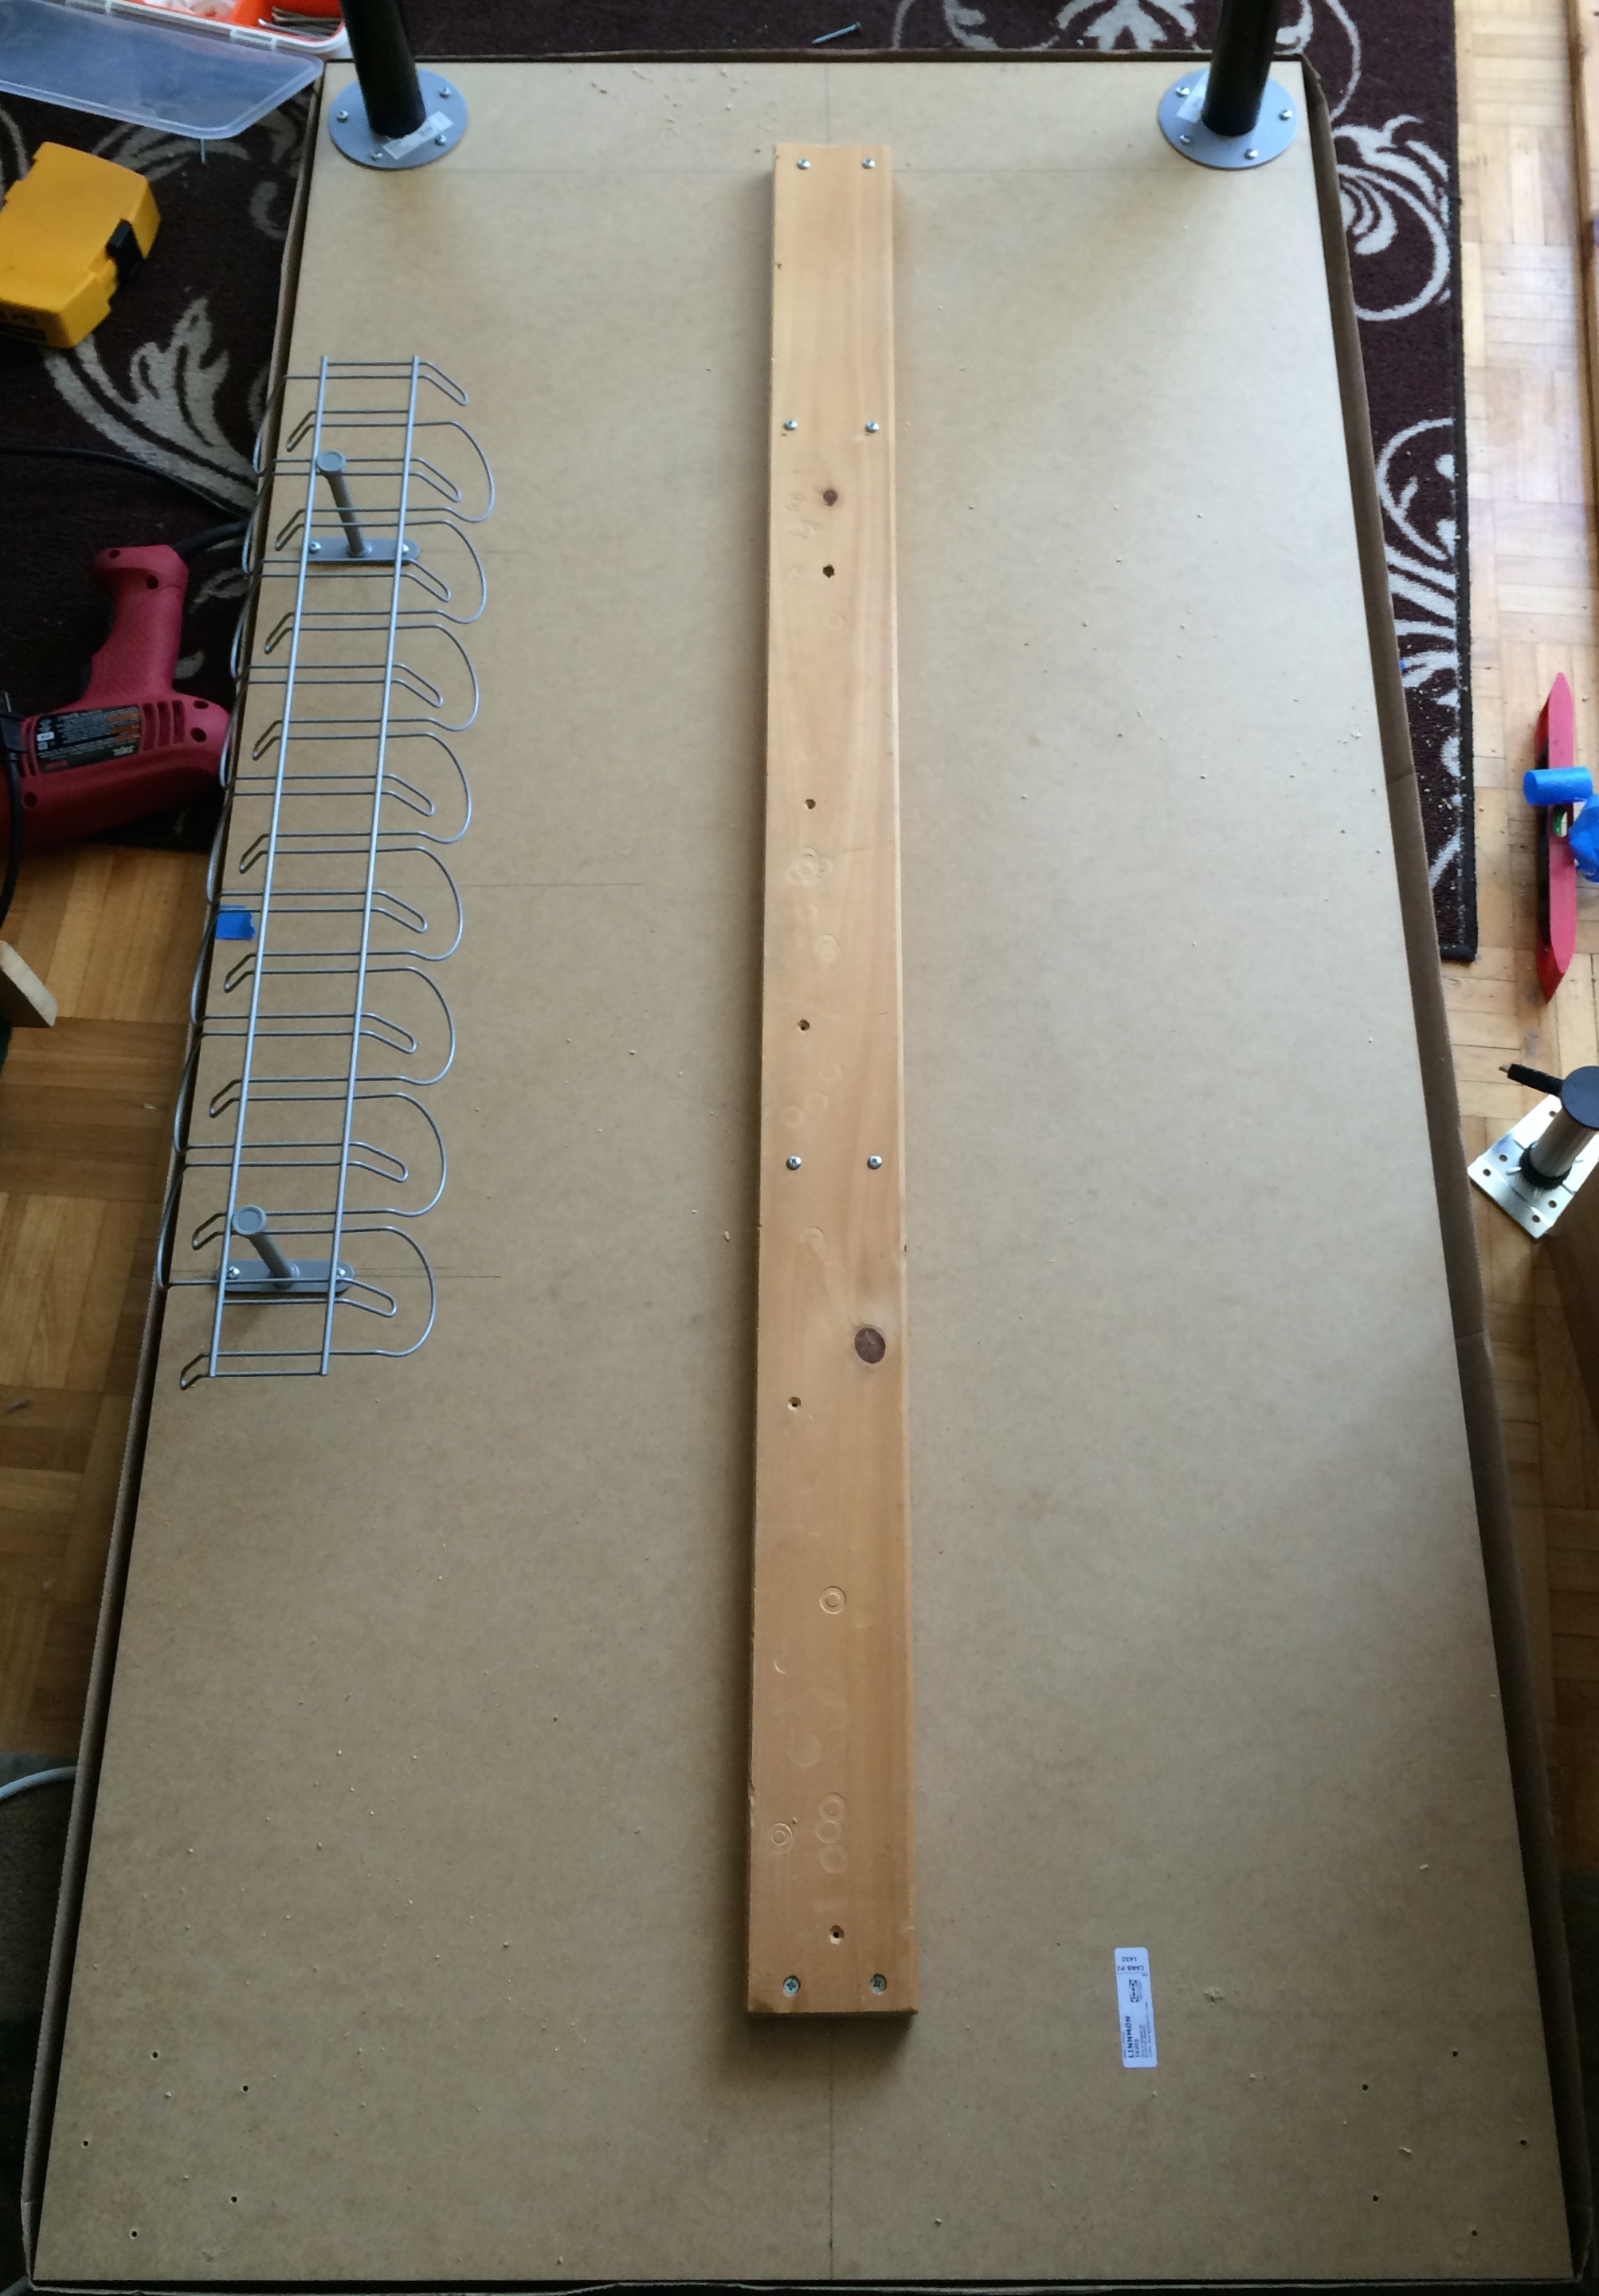
This rib adds some rigidity to the central part of the table top, stays out of the way and lets me sleep at night without worrying about potentially thousands of dollars of electronics crashing to the floor from it collapsing in the middle. Ironically the scrap pine came from my old hack-desk which was a reclaimed Ikea futon that I found that was broken and tossed in the rubbish.
Part Two – Strong Attachment
I attached the Linnmon desktop to the Kallax shelf using two sets of the connector packs – at $5 per pair it seemed a reasonable thing to do to ensure it stays attached to the shelf unit in a sturdy fashion.

I cannot say for certain, but I suspect if you already have an Expedit that you want to add a desk to, the Linnmon connectors will probably fit it. Note that you are not limited to using their Linnmon table tops, the connector brackets will fit any of Ikea’s table tops except the glass ones – it has to be able to bite into the bottom side of the material with it’s spikes so any wooden tabletop will do.
I used two pairs to play it safe since the brackets do seem to bend a little bit when installed. It’s pretty tough metal, but I just wanted to be certain. Much like the support rib under the desktop, my theme was the old saying “an ounce of prevention is worth more than a pound of cure”.
I may go back and add a second support rib if I find that the natural (slight) sag to the desktop shows any sign of increasing and also because I have and identical length of scrap pine sitting around.
Hack # 2 – Mega Monitor Stand
I have two flat screen monitors sitting side-by-side so I needed a fairly wide stand for them to raise them to the correct ergonomic eye-level. I found that the middle shelf level of the Kallax unit was just right for the desktop height but the monitors sitting directly on the desk were too low for comfort. I sit in this space for a ridiculous amount of time and my previous experience has shown that it doesn’t take much for the height to be a little too low and cause major chronic pain.
Inspired by the many low-cost monitor stands found on ikeahackers.net I set out to take a shelf and mount it on some Capita legs to create a nice platform to hold my monitors, audio/MIDI interface, speaker controls, etc.
The first part of this task was pretty simple – the Ekby Jarpen shelf was a little wide at 119cm, but Ikea really only sells suitable shelves at this width or 75cm. The shorter width was too small for two large screens to sit on. Regardless, the extra length is still short enough to fit a large speaker on each side at an angle without feeling crowded. I can still get into the Kallax cubby on the side the desk attaches it – it’ll do just fine.
I got two packs of the shortest Capita legs. Naturally I put one leg on each corner, then used three from the 2nd pack spaced along the back. The shelf didn’t seem likely to sag from the weight on it, but as I have previously said – I’m purposely overbuilding this a bit to be on the safe side. You might want to use all four from the 2nd pack, either putting the extra one in the middle of the front, or spacing them between the edges depending on your taste. I’ve got one left over, I’m sure I’ll find some use for it eventually.
Part One – Hide That Unsightly Sore
I used some flat black dollar-store craft acrylic paint which is water based to cover the raw particle board on the back edge of the shelf. There’s not much to this – the idea is to hide the raw wood. I used a foam brush to dab the paint down across it, cleaning any over-paint on the finished sides with a wet rag. You could certainly put more work into it and use wood fill, primer, sanding and a better quality paint – or some black veneer, or even try to match the Ikea veneer if you’re so inclined. I figured nobody in their right mind is going to be looking that closely at such a thin line on the desk, even though that side faces into the room. I went over it a couple of times without waiting for it to fully dry – the next two passes I dabbed a thick amount of paint into the deep holes in the particle board and then smoothed it out a bit with the foam applicator.
From a couple of feet away (standing right beside it and looking down) it’s just a slightly textured black shade that blends into the black-brown of the rest of the unit – it doesn’t stand out at all, it’s just black and masks the raw wood which would otherwise stick out terribly.
 It isn’t quite dry yet in the above picture, but you can already see how the flat black gets lost in the brown-black veneer of the pieces.
Part Two – A Capita Idea
For the monitor stand legs the start of the process is fairly easy – attach the Capita leg mounts to the underside of the shelf board. I started with the corners and taped the mount to the desk in position, put in two screws, removed the tape and then added the other two. Really nothing to this, you can just eyeball them into position and use painters tape to assist holding them in place while you get the first two screws installed. No pre drilling was required, the packs come with self-tapping screws.
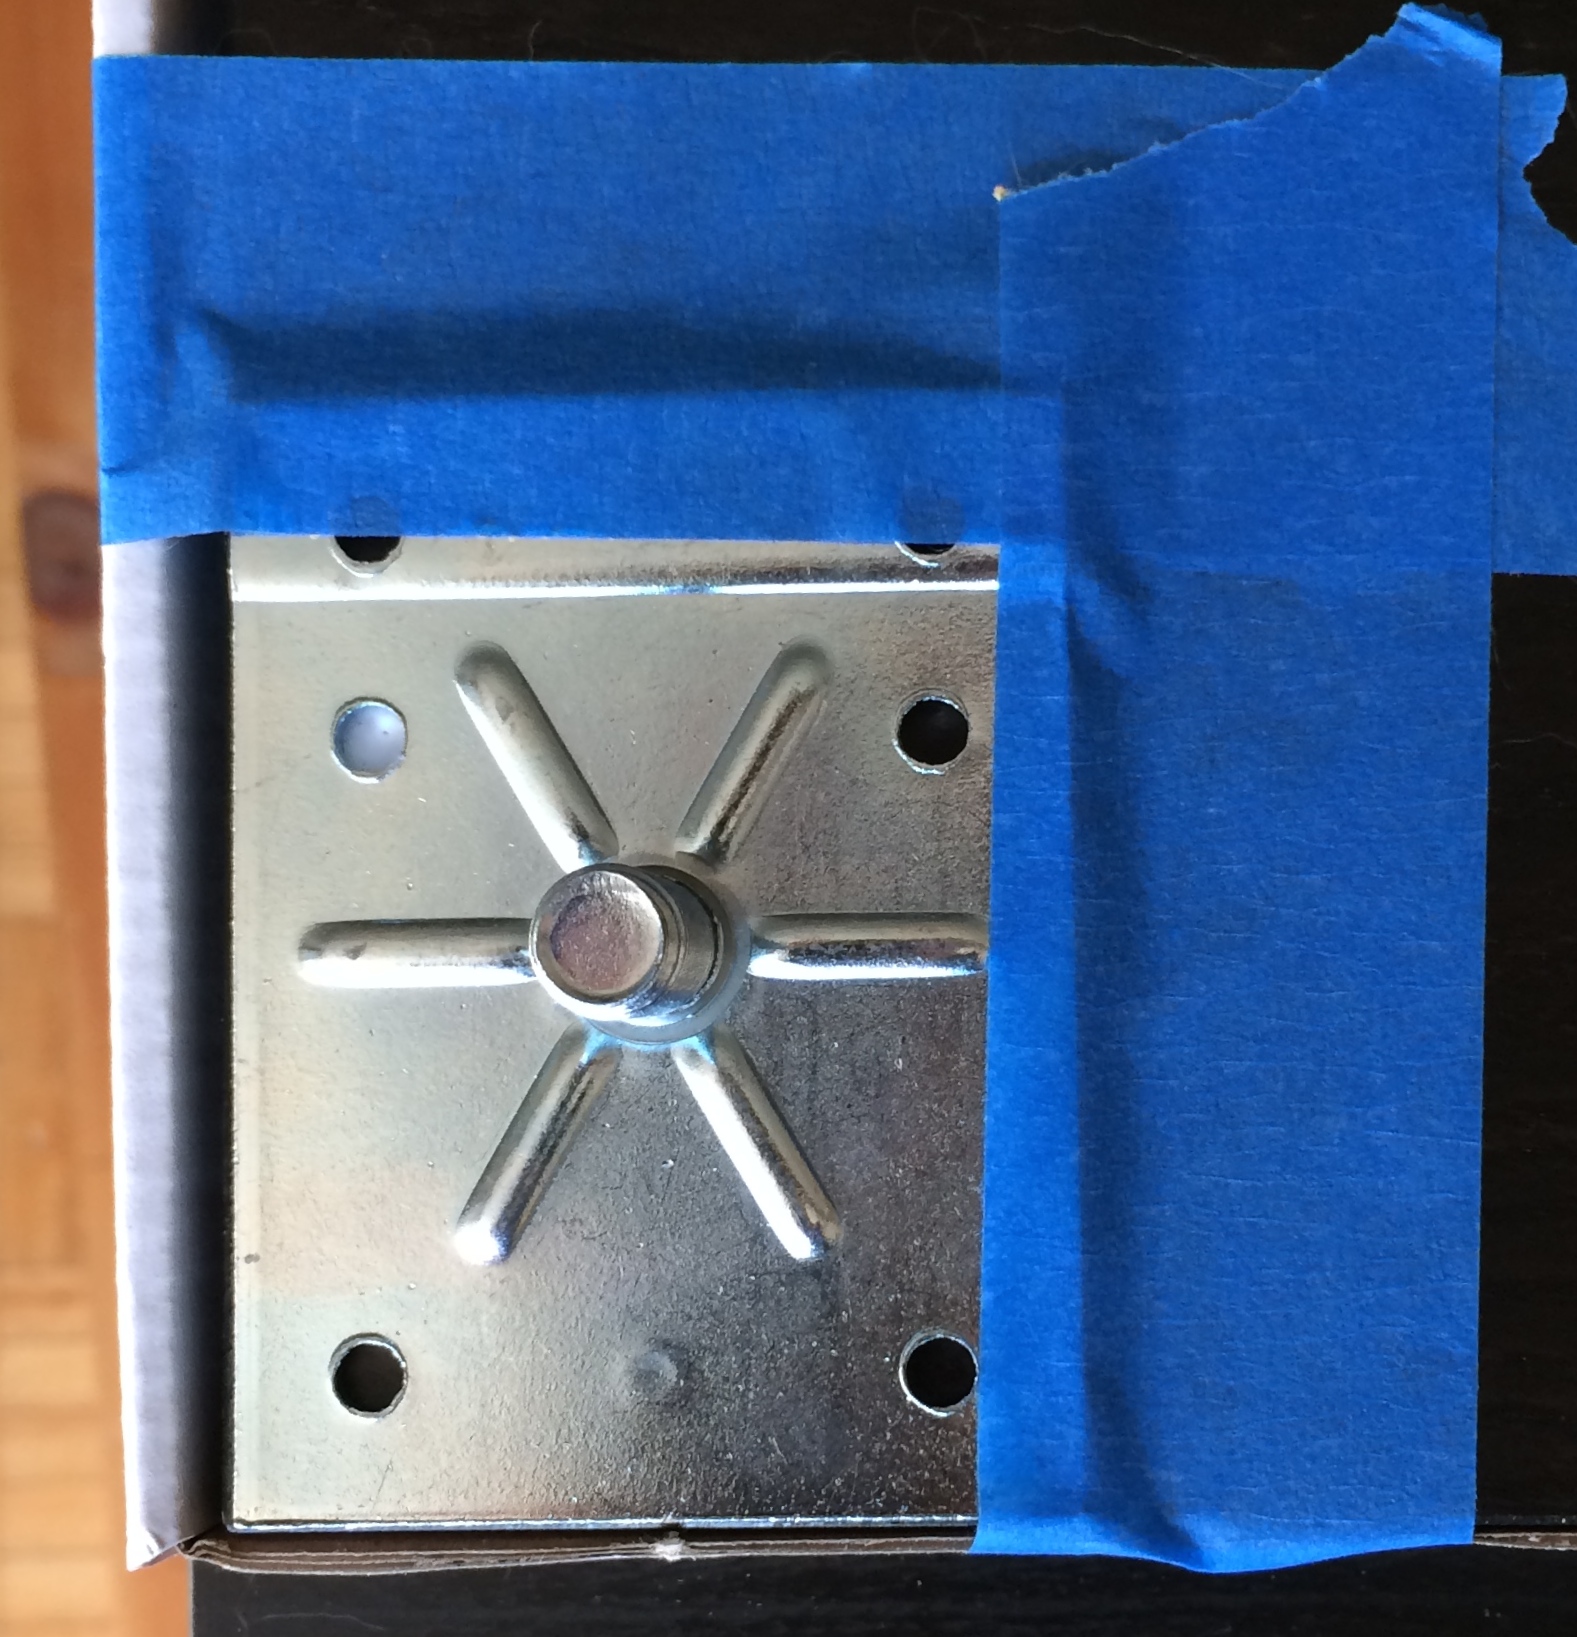
Here is the first four mounted to the underside of the shelf unit. Note that I have a piece of painters tape indicating which side is the front of the shelf – if you plan to leave the front side open like I did, you need to be aware of this.
I apparently neglected to photograph the installation of the remaining three legs but it was merely a matter of dividing the width of the shelf appropriately, taping down the mounting plates to the right spots and then screwing them in.
Some people have used a form of adhesive (typically “liquid nails” from what I’ve seen) to attach the stand to the desk but this did not appeal to me. Although I have very strong cabinet glue on hand, I wanted to really make sure this wasn’t going to move and that requires some screws. If you’ve ever seen the Capita legs, this poses an interesting conundrum – the feet have a flat plastic cap on the end – hence the tendency to use adhesives, I’m sure.
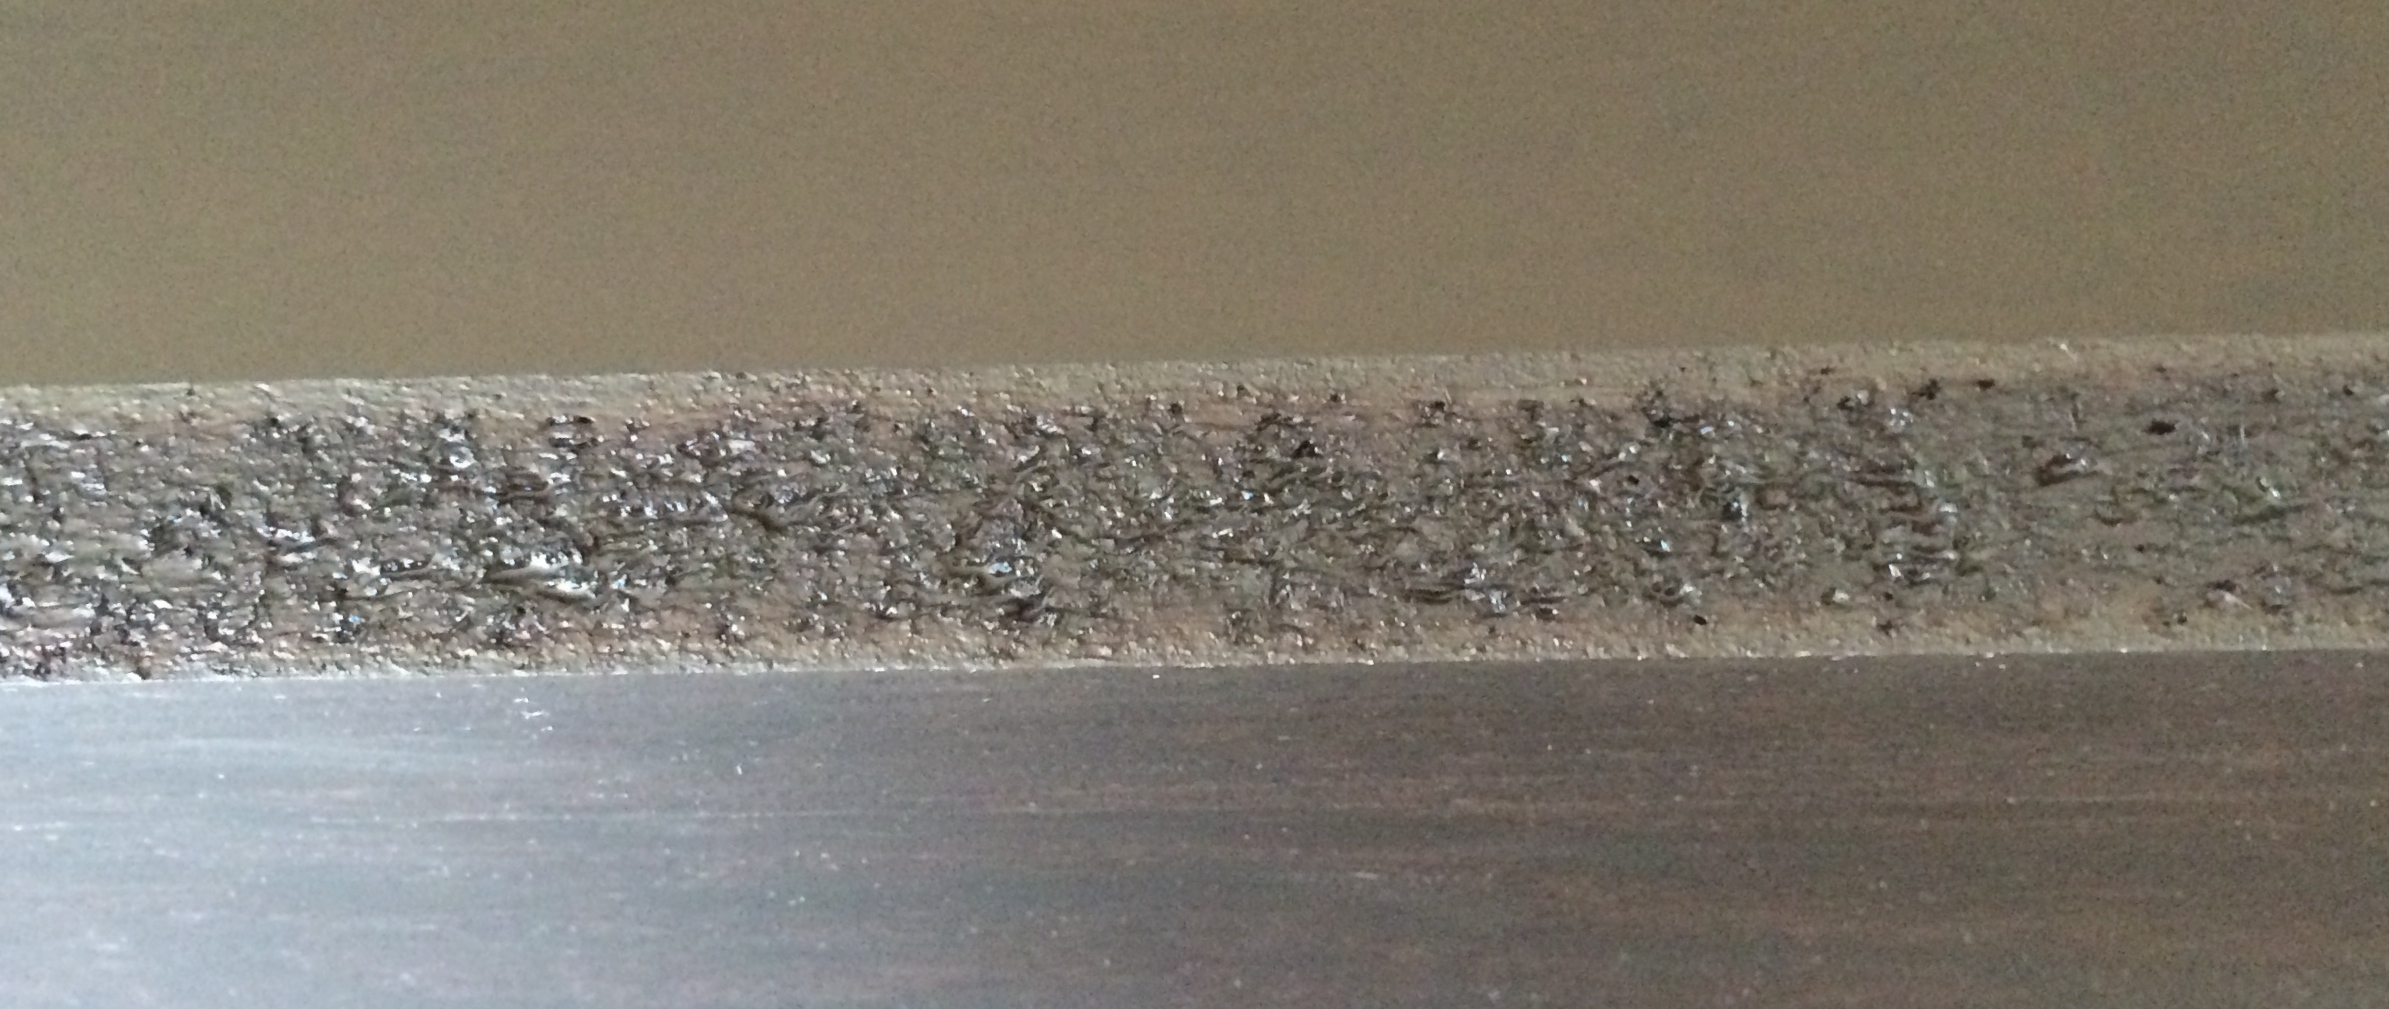
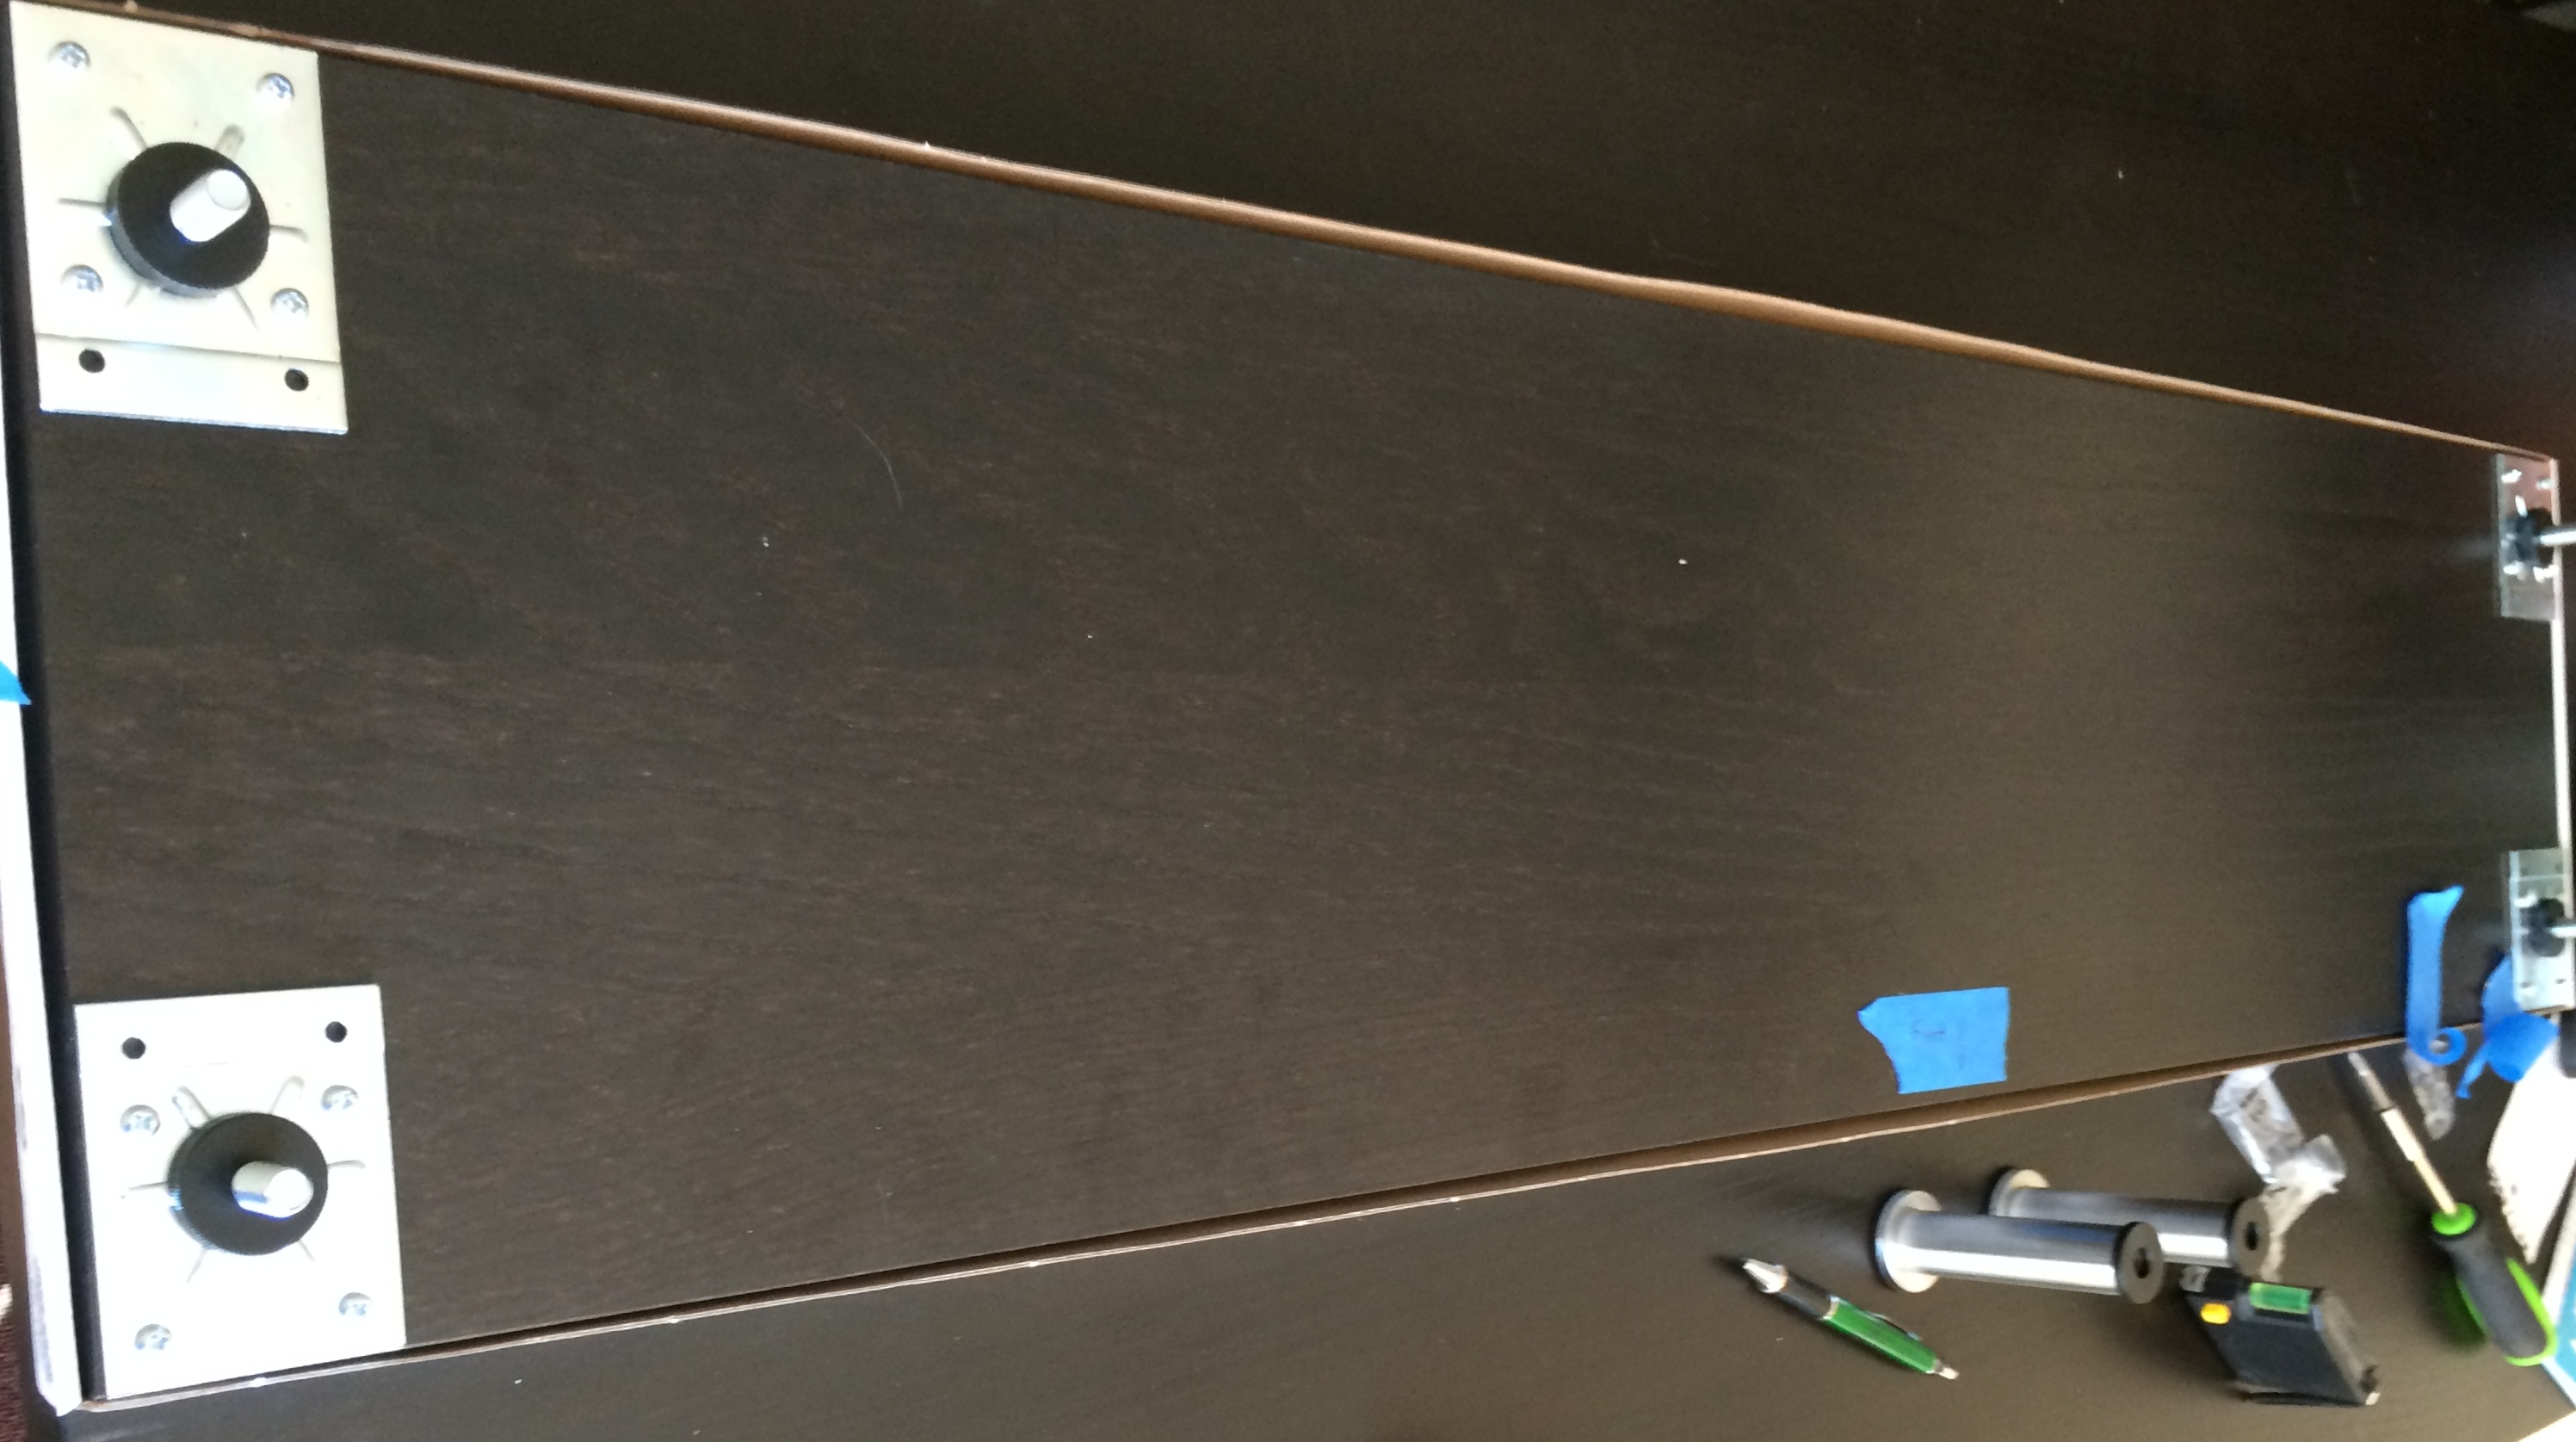
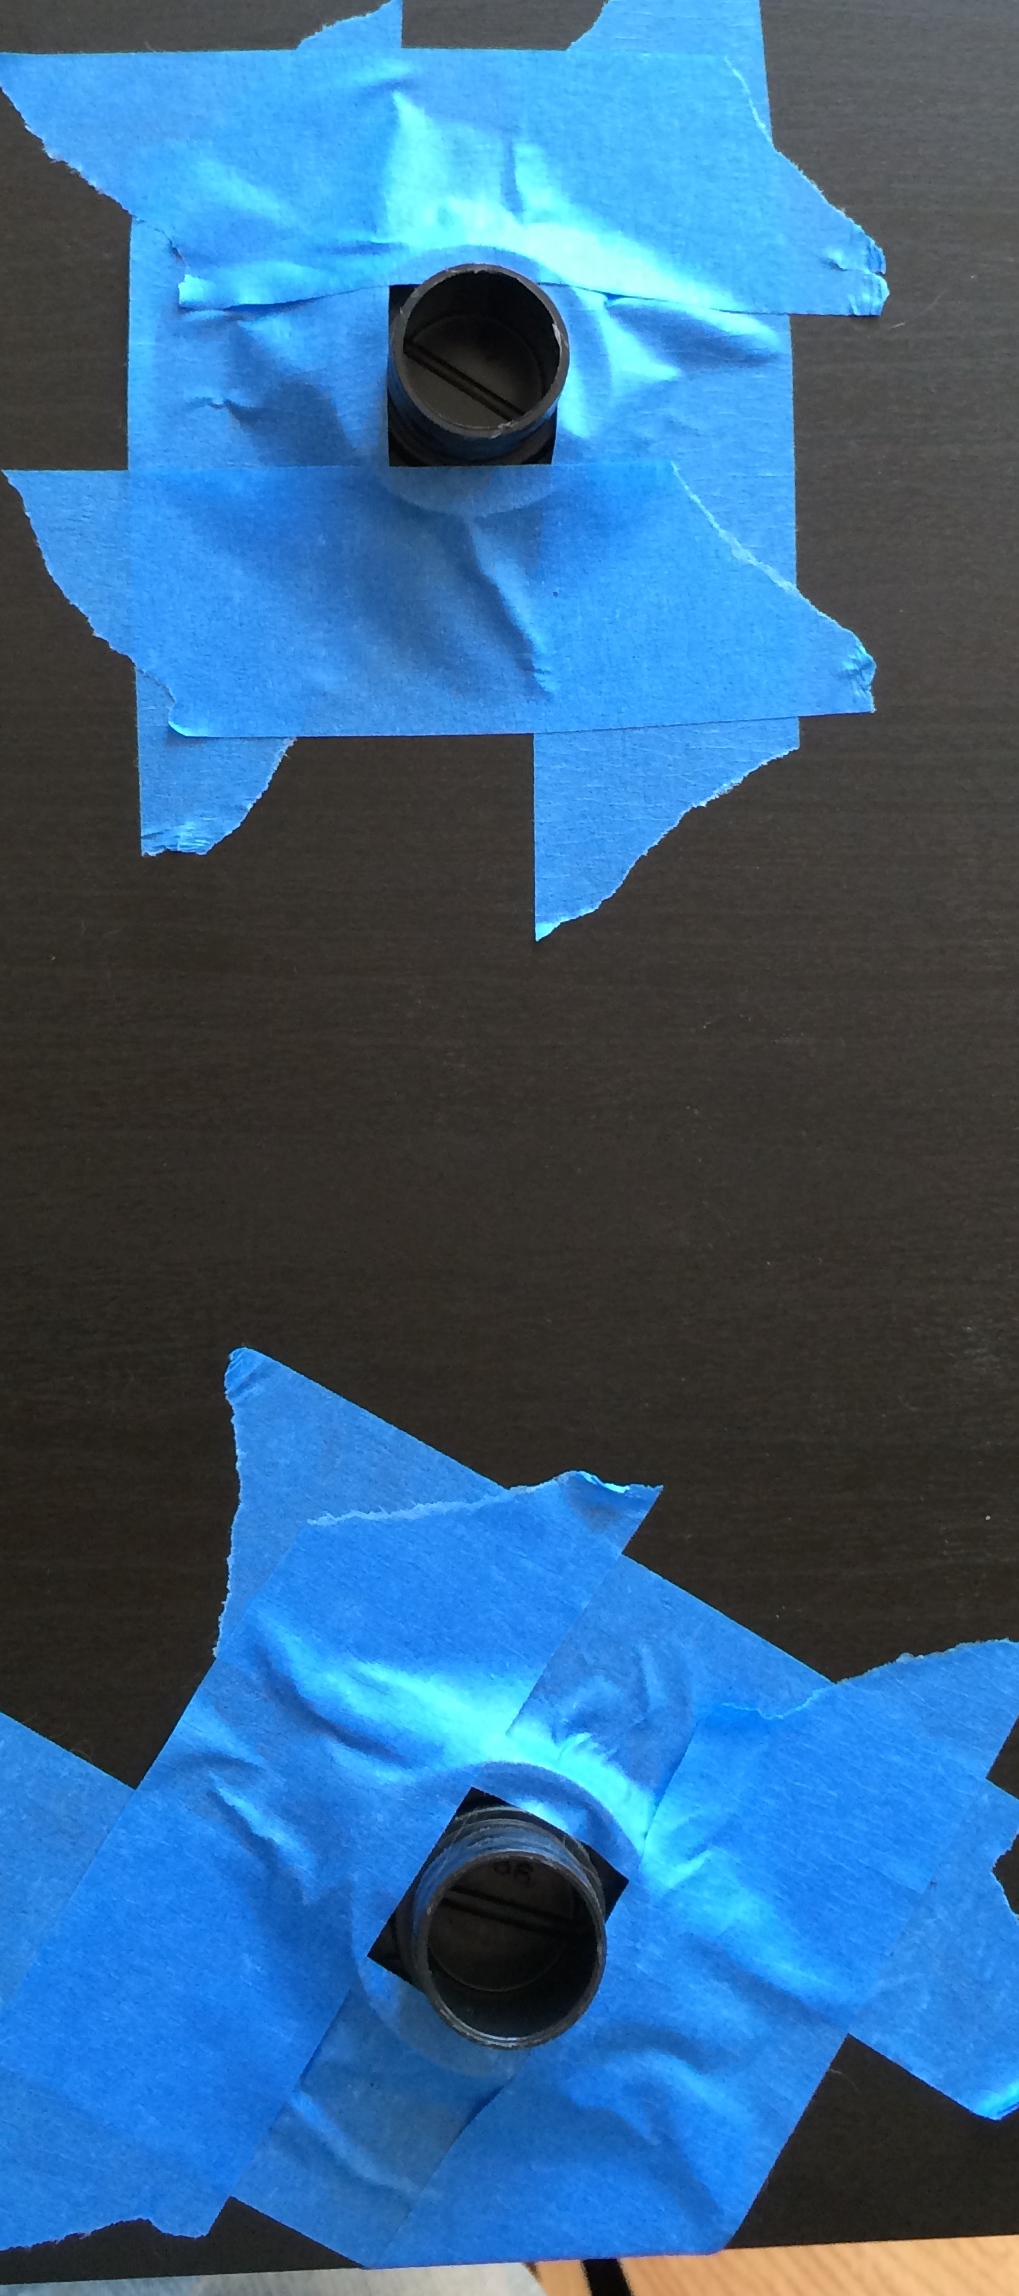
Part Three – Blind Mounting
A bit of searching online led me to the discovery that you can just pull the caps out of the legs leaving you with a plastic plug and a metal ring like this:
This gave me some inspiration as to how to mount them onto the desktop surface. I pulled the feet off of all four corners and the middle-rear legs, put the metal rings aside and then replaced the plugs into the legs. I didn’t push them all of the way back in, I left them loose.
I then flipped the assembly and placed it onto the desktop. I used my metal square to line the edges up and got it centred on the desk – I’d previously measured this out and put some painters tape in the middle with a line drawn at the exact centre of the desktop.
I then used a generous amount of painters tape to tape the plastic caps down to the desk surface where they need to be mounted.
 I then very carefully pulled each leg out of it’s foot, leaving the plastic caps taped to the desk surface.
 I
I
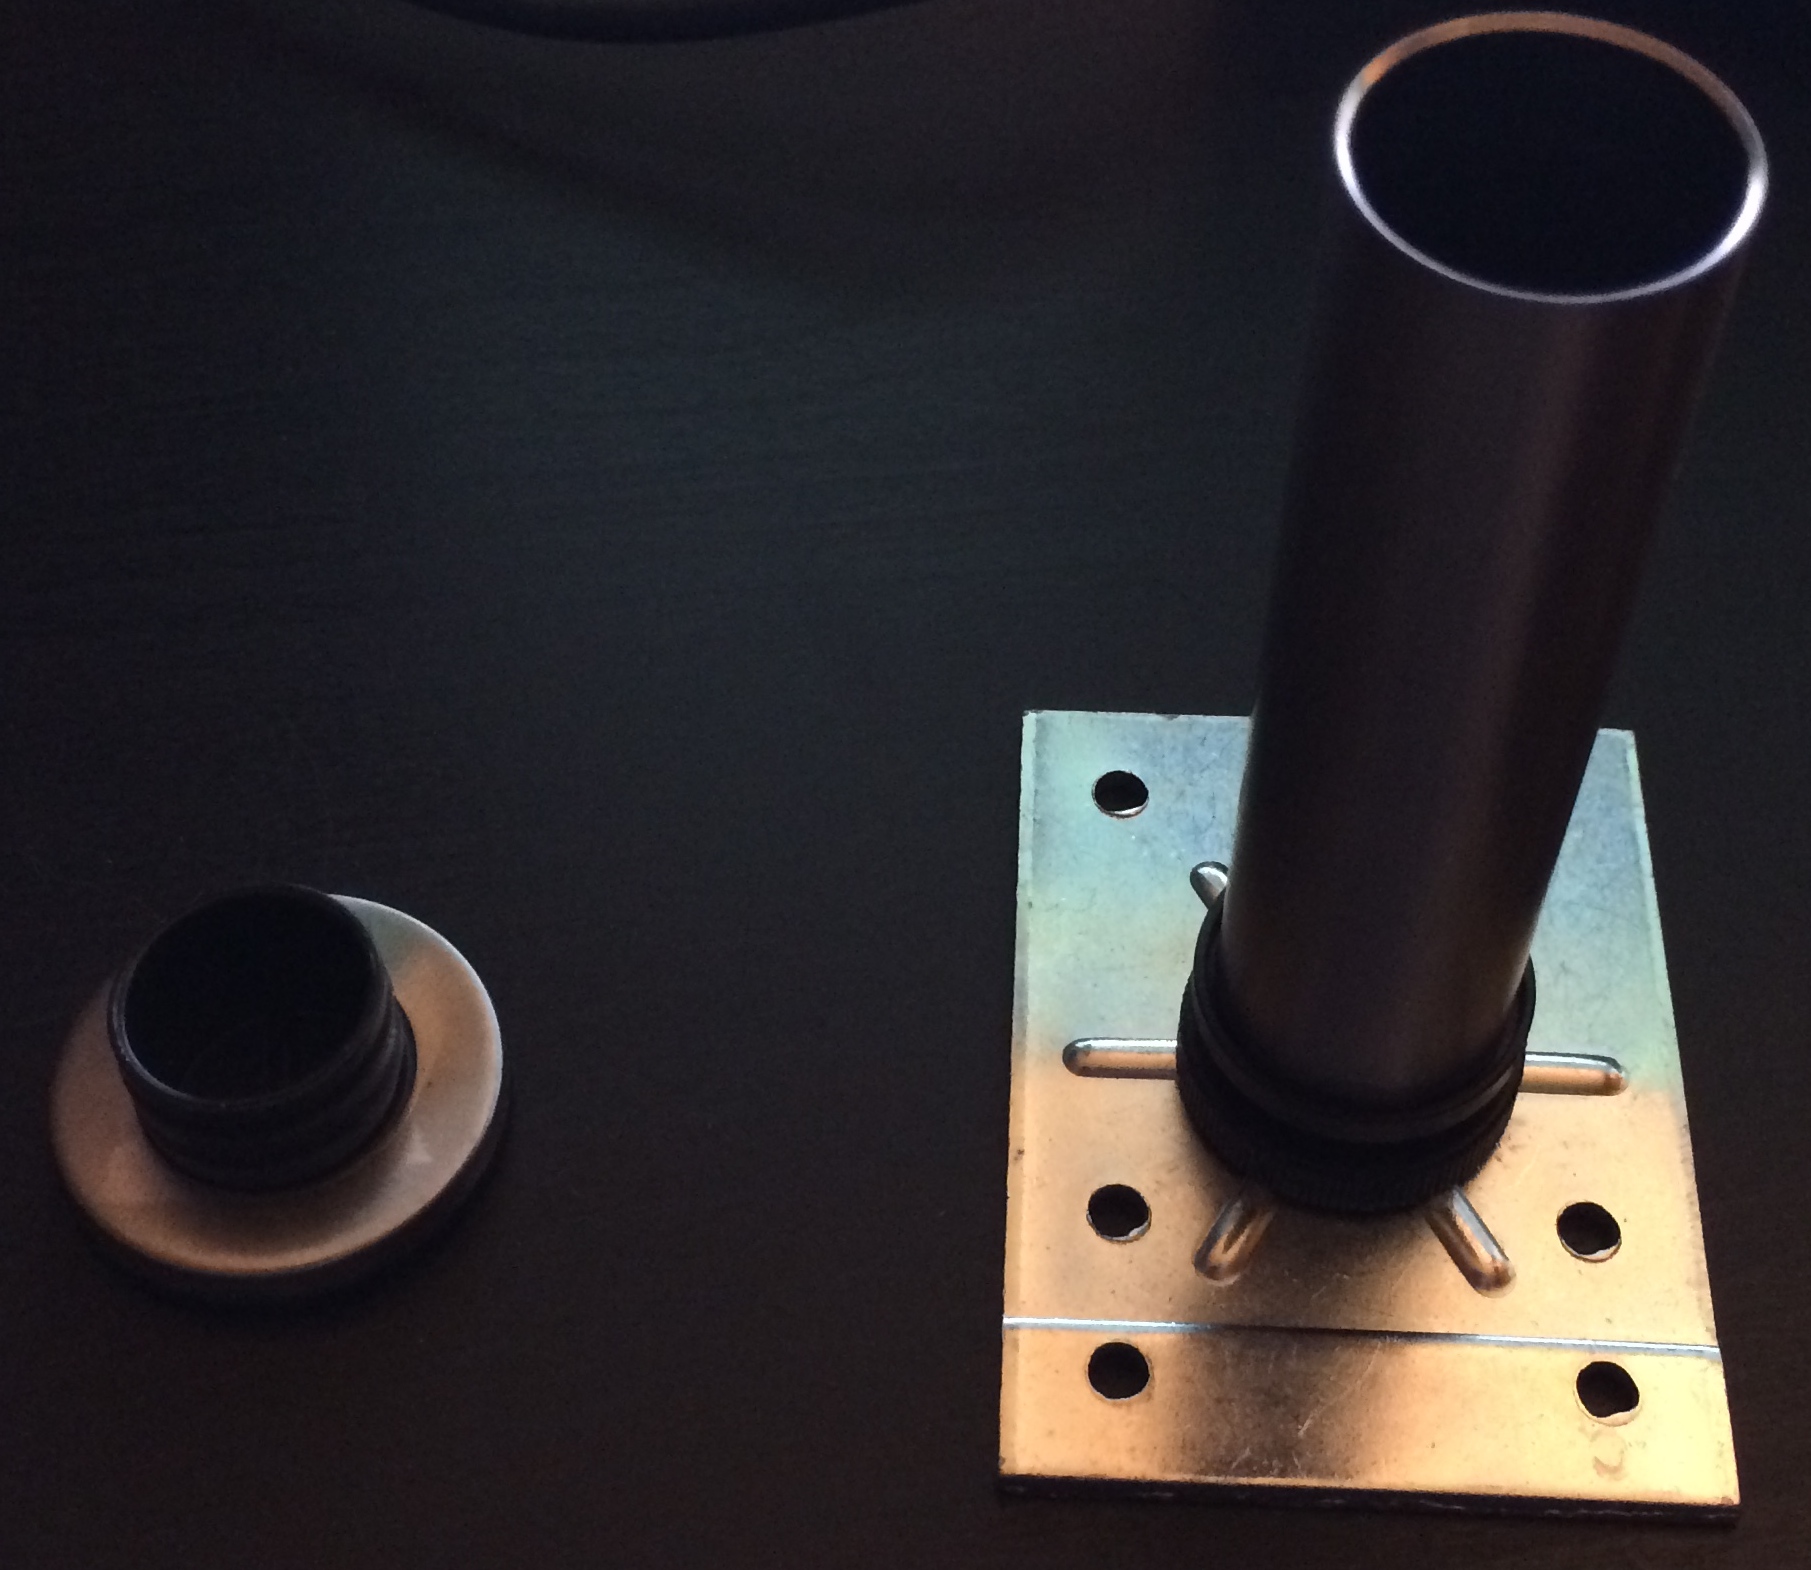
I then held them in place and drilled a hole through the middle of each one, into the desktop. If I was to ever do this again I would probably pre-drill the feet caps from their bottom side as the ridge you can see in the middle made it hard to centre the hole. Ultimately it’s not a major blocking issue, try to get as close to centre as you can, but in the next step don’t mix up the feet from where they were drilled. If you’re off-centre, it’s easy to deal with as long as it matches the the foot you drilled. Drill all of the way into the desktop surface but not all the way through the desk – you ideally only want to drill the top. If you go too far and put a hole in the bottom, it’s not the end of the world since you’d have to be under the desk looking up to actually see that hole anyway.
In case it wasn’t obvious – the next step is to remove the tape, put the foot nearby and then push a drywall plug into the resulting hole.
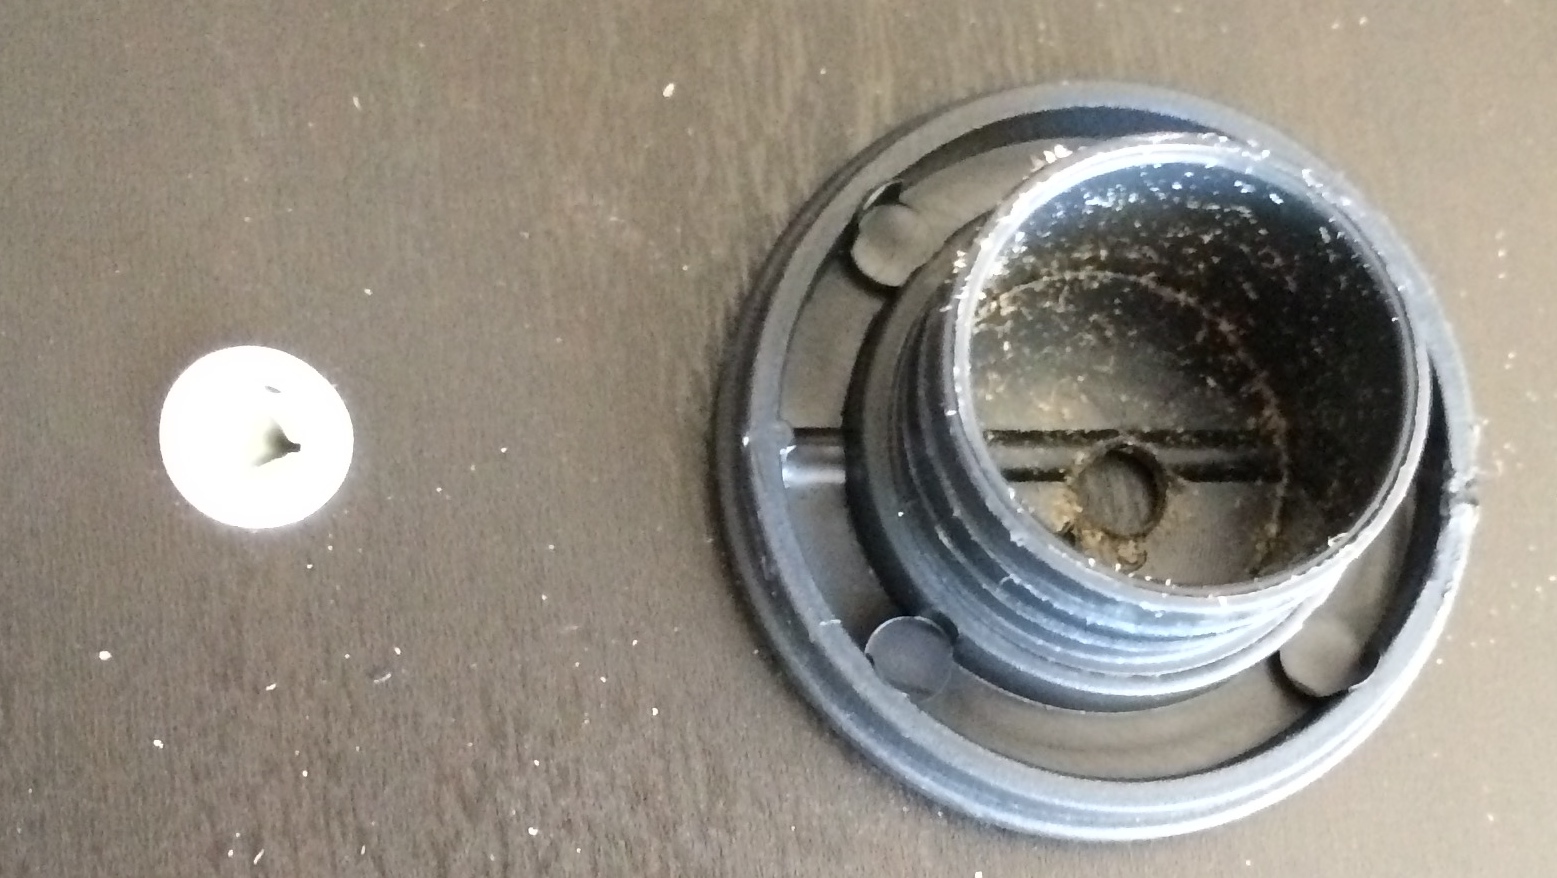
The above picture illustrates the issue I mentioned about it being hard to hit direct centre with that rounded ridge down the middle of the foot – the drill bit really wants to drift off-centre, but it’s not a big deal as long as you don’t mix up the feet.
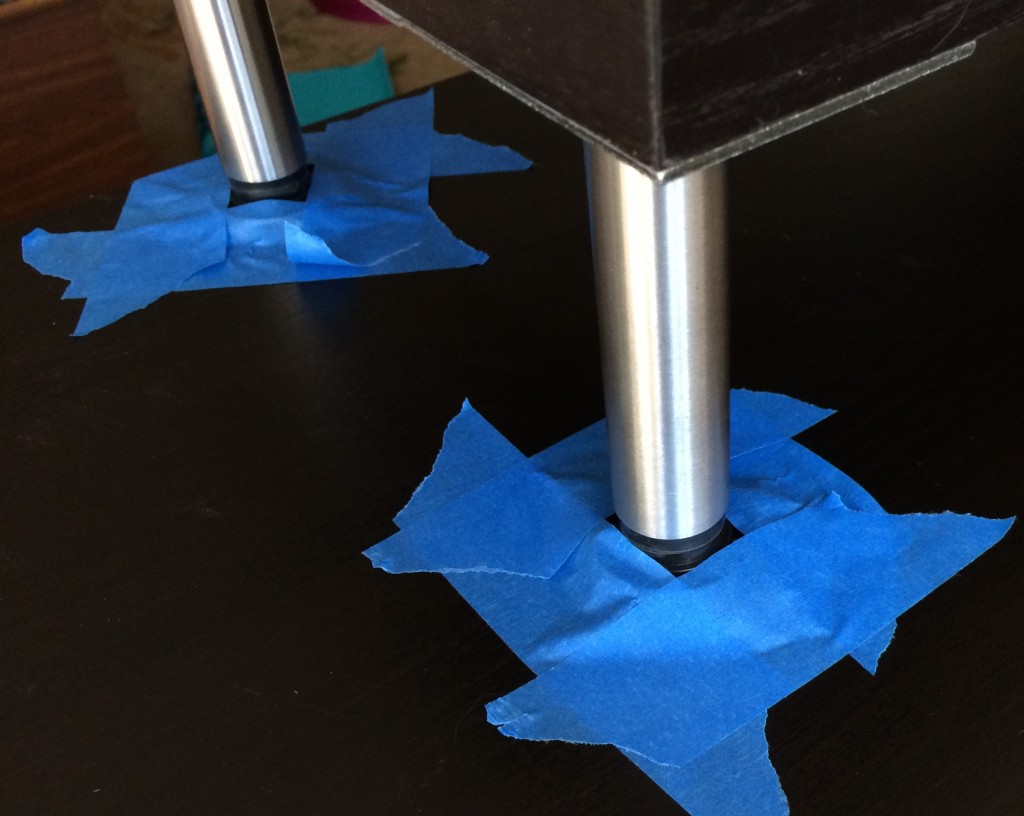
Put an appropriate length screw through the foot into the drywall plug on each one. Next, replace the metal ring over the plastic feet plugs and then put the shelf unit with the legs attached to it over the feet. If your holes are not centered, rotate the plastic foot around it’s screw (clockwise preferably to prevent backing the screw out of the hole) until it properly lines up with the leg.
When you’re done you should have a sturdily mounted shelf/monitor-stand with blind screw mounts that looks to be magically mounted to the desk:
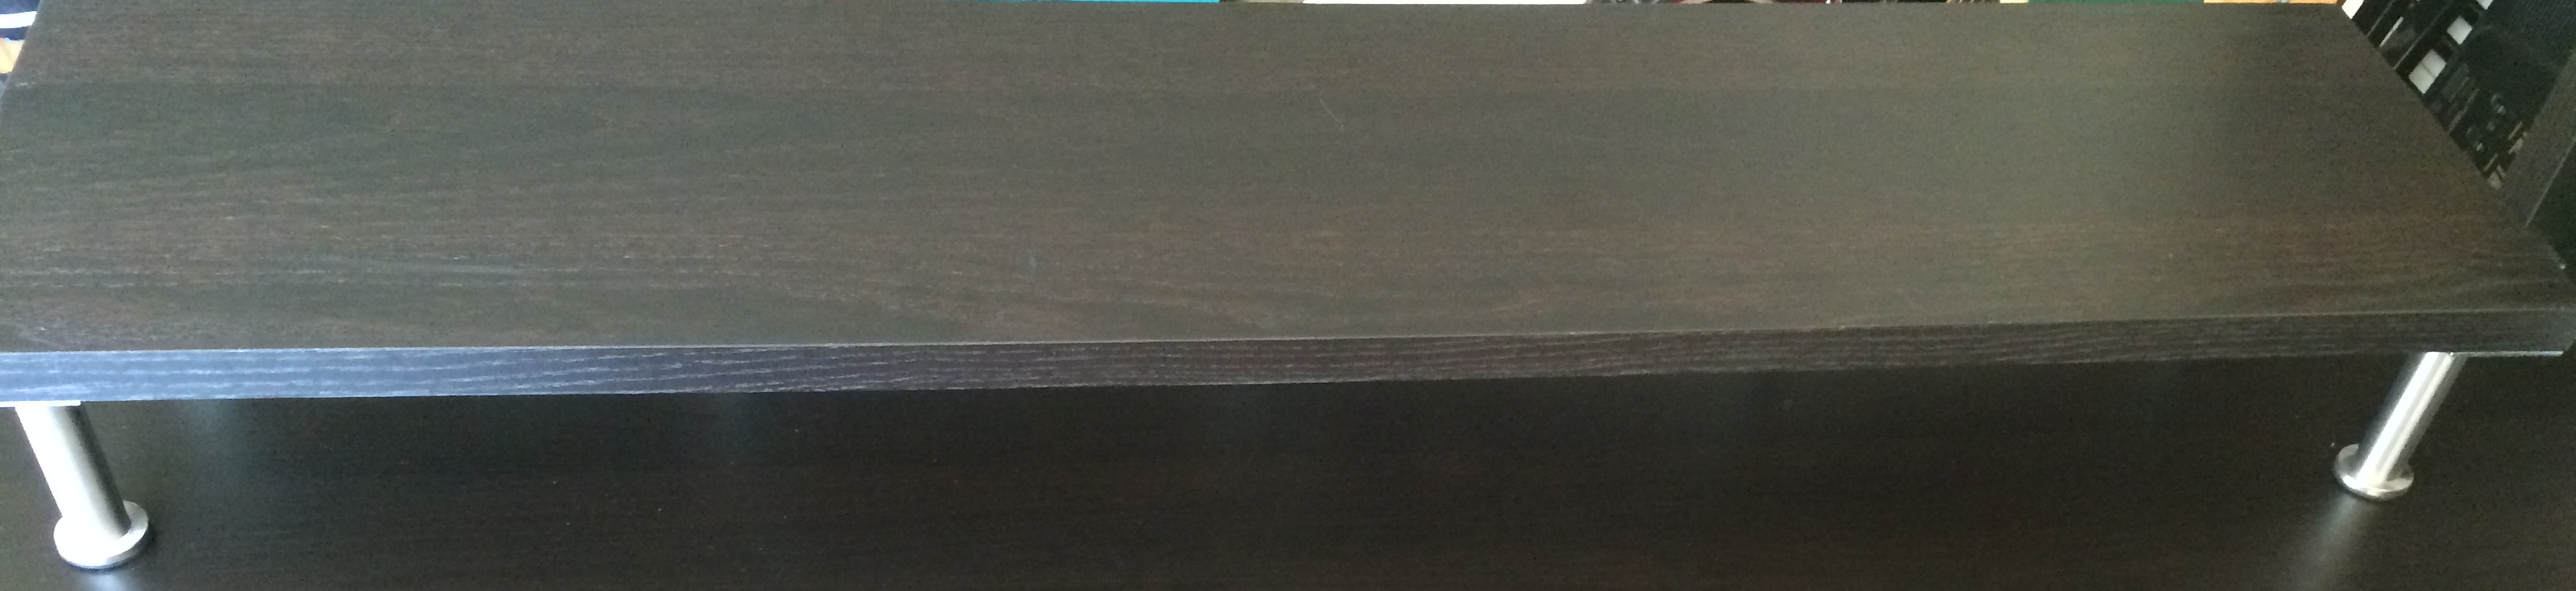

Adjust the in-between legs to match the height and keep everything tight. The end result is in my opinion very visually appealing, neatly mounted and quite securely attached.
This whole process took very little time and required only a power drill and a screw driver to accomplish. Note that in the above photo the flat-black edge on the rear of the shelf blends right in with the overall assembly, it really doesn’t need a full-finish effort to look nice unless you’re some sort of perfectionist or happen to have some appropriate veneer on-hand.
Helpful Tips
– Use expanding plastic expanding plug inserts.
When mounting things directly to a Linnmon (or similar) table top, always use common plastic drywall plugs in the screw holes. These table pieces are made like an average interior door – it is hollow inside with a cardboard honeycomb fill. This makes for a relatively strong and very lightweight item, however the thin surface wood is merely veneer over a thin sheet of fine-grain pressboard. Much like mounting something to a sheet of drywall, there isn’t very any really solid material for a screw to securely make purchase with.
A plastic plug will expand when the screw is inserted and grab the surface from the inside, creating a strong connection that will not disintegrate and pull out easily. I cannot stress this enough. Use expanding plastic expanding plug inserts. Ikea sells inexpensive shelf kits full of screws and drywall plugs, as do any local hardware store. Putting screws directly into these kinds of pieces and expecting them to stay there is a major gamble. The only exception to this is mounting Ikea legs onto the pre-drilled leg mounting holes on the Ikea table tops. I’ve not cut one open, but I believe they have reinforced this area of the assembly during manufacturing for you. That being said, I wouldn’t remove and re-attach the leg mounting plate if you can avoid it – it doesn’t seem sturdy enough for that.
– Keep the cardboard packaging
When working with Ikea desktop and shelf pieces, don’t throw out the cardboard packaging when you unwrap it. When measuring/marking/drilling the bottom side of the pieces it’s helpful to put them back in their cardboard shell to protect the surface finish of the piece as well as whatever surface you are working on. You can see in the above pictures that I’ve done so. The packaging for these pieces consists of a cardboard shell covering all but one side and then is wrapped in shrink wrap. They’ve made it nice and easy for you to work with it and not scratch the surface – I don’t think it was on purpose, but it would be silly not to take advantage of this benefit to the packaging.
– 3M Blue Painters Tape
Even if you are not painting your project, this tape is a huge benefit especially if you are building/hacking solo. You can use it to tack pieces in place before screwing in self-tapping screws. I found it very handy when installing the drawer and door units in the Kallax shelf – I used the Ikea plastic guide to place the interior insert, taped it down and then only had to apply some mild pressure to the piece to keep it from slipping when inserting the screws. The tape peels away easy and leaves no adhesive behind. Much like Frank’s RedHot Sauce – I put this sh*t on everything.
– Putting the Computer up on top of the Kallax Shelf
In order to conserve desk space and to keep the computer cabling away from one of my cats that likes to chew on everything she can get her mouth on I needed to put the big honking CPU tower somewhere out of the way. I designated the least accessible cubby of the Kallax unit to power and cable routing. This cubby is the one directly under the desk, at it’s rear-most area. Hard to reach without crawling under the desk, and it’s partly blocked at the top by the Linnmon connector brackets. I installed the power bar inside that space which also makes it more convenient for tying the wiring to the underside of the desk out-of-the way. I needed to obtain a 10ft and 15ft video cable to connect the monitors in this fashion and had long enough cables to accommodate everything else. I have a seven port powered USB hub mounted on the desk which can accept my audio unit, bluetooth adapter, keyboard and USB microphone with three ports to spare for incidental devices. All the computer cabling is velcro tied neatly from the PC down behind the Kallax unit and exits into the rear of the spare cubby. Nice and neat.
Part Three – A Hacker/Maker Friendly Desk Surface
Why such a large desk surface for a computer table you may ask? Further, you might wonder why I left the front of the monitor stand open and did not add a leg there. Well, you sure are an inquisitive reader, aren’t you?
The concept I have in mind is that the open area of the desk is to also be a hacker/maker work surface. The keyboard/mouse/interface-perifrials for the computer(s) can be tucked under the monitor stand. My plan is to have a large sheet of acrylic that can be placed across the desk to make a work area for cutting, working on computer chassis and soldering as well as whatever my next hack might require. In order to protect the desk surface from the kind of abuse that entails I will be using the acrylic sheet as a work surface.
The general plan is to have a thin set of brackets under the desk surface to store the acrylic, and it can be pulled out when needed and placed at the front of the desk… But since I’ve yet to cut the sheet, design the brackets or actually implement this plan beyond purchasing the necessary plastic – you’ll just have to wait until the next instalment!
3 Responses to “Ikea Hacking – Kallax and Linnmon Mega Desk”
Trackbacks/Pingbacks
- Miniature Guitar Amplifier – New Power Amp Chip | novakane.ca - […] much has changed from my previous build, I got occupied for the last week or so with building a…

Great article, very useful. So, I have a Linnmon top with Krelle legs but am getting warping because of condensation caused by gas canister heating. (Yes, I probably need to get a dehumidifier but I need to make sure the table stays flat). If I understand your article correctly, it’s safe to drill holes in the middle of the Linnmon top to mount a spine as you have done. What thickness of pine plank do you recommend, and what length of screws? How far apart are the screws? Anything else you think relevant, feel free to share. Thanks again for any help you can give.
The pine I used is 3/4″ thick. The Linnmon top is essentially two sheets of veneer with a cardboard honeycomb inside. You will want expanding plugs that are about 1/2 to 3/4 the thickness of the Linnmon piece in length and your screws should be the same length plus the thickness of the reinforcement wood. Careful not to use screws that are too long or they’ll come out the other side which is not what you want. 🙂
If humidity is causing warpage you will likely want to make sure whatever you use to reinforce it is sealed wood, otherwise something like the unfinished pine like I used is likely to also warp and contribute to the problem rather than resolve it.
I was fairly cavalier about my screw placement, and if you’re fighting warping already in the Linnmon piece you’ll probably want to place them every 4 inches or so along the reinforcement. You’ll also need to find a way to get the Linnmon top as flat as possible, so that the reinforcement is actually holding it against the existing warp.
Hope this helps, good luck!
Great to read